
Drawing and editing boundaries
Drawing a boundary means selecting census areas. There are three ways to select, and one control that decides how fine the areas are.
🔴 Corrected 2026-10-13. Until this revision this page told you to set the census area with a control on the map, next to the basemap button. There is no such control on the map, and there was none in the picture this page used to illustrate it. The census area is chosen on the territory card in the tree, and only while map management mode is on. If you have been looking along the top of the map for it, that is why you could not find it.
Turning map management mode on
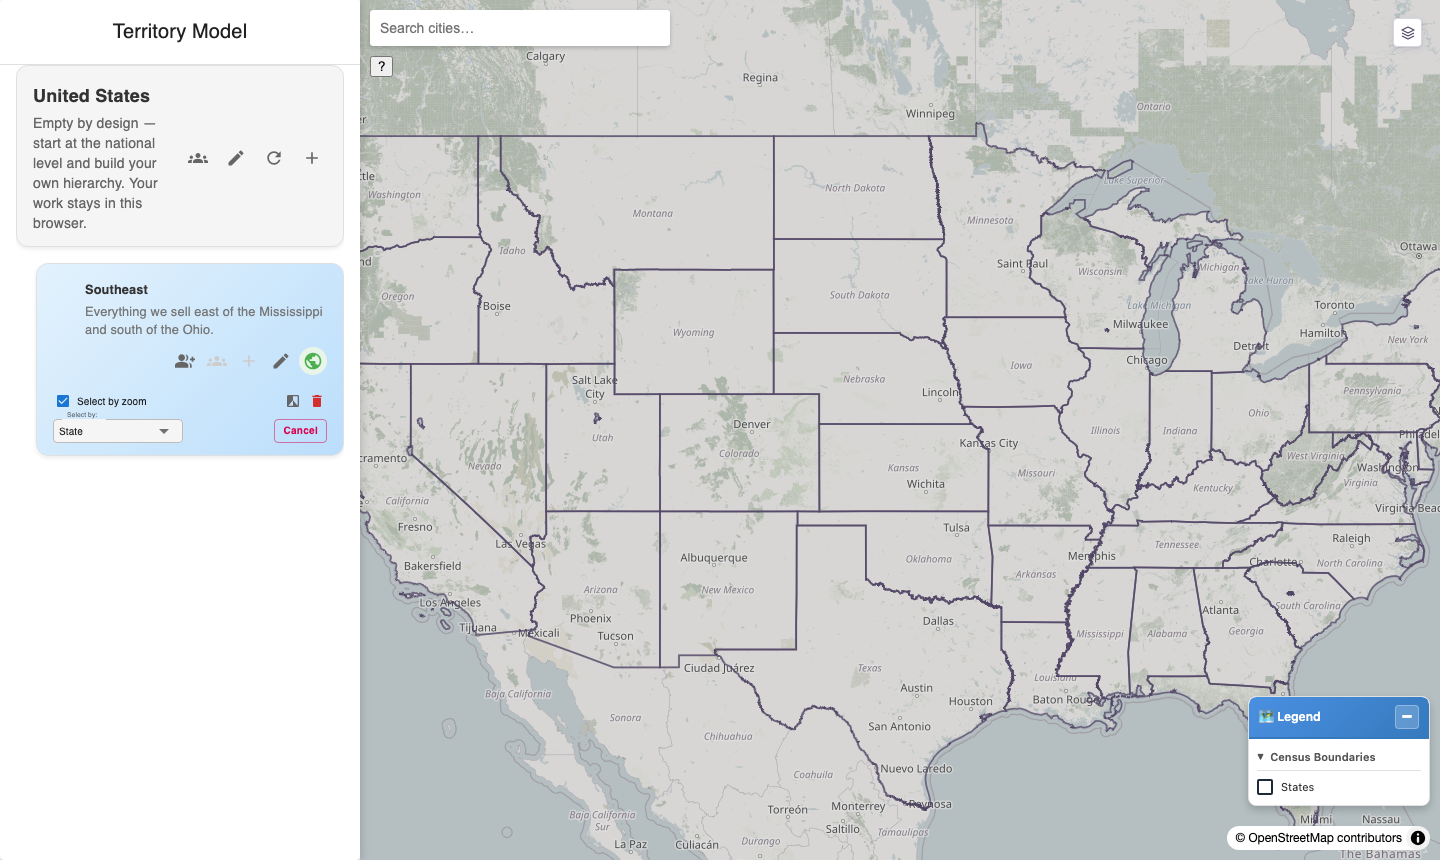
Map management mode. The card turns blue, the globe turns green, and the map now answers clicks by selecting census areas instead of showing their details.
Press the green globe on a territory's card. That is the whole of it. While it is on:
- the card turns blue, so it is obvious which territory you are editing;
- clicks on the map select census areas for that territory;
- the card grows three more controls — the census-area chooser, the lasso, and the bin.
With it off, a click on the map shows a census area's details instead of selecting it.
🔴 Only one territory is in map management mode at a time. If clicks seem to be going to the wrong territory, look at which card is blue.
Choosing how fine your selection is
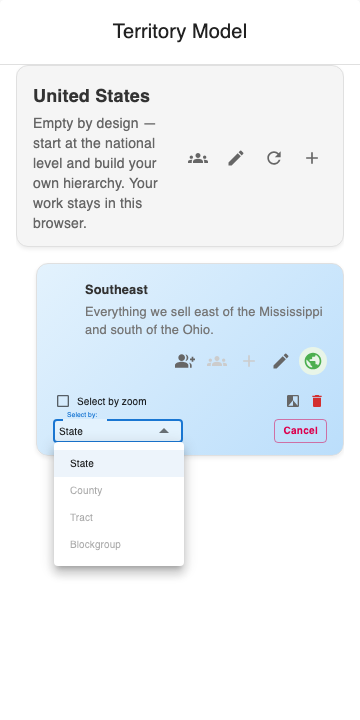
The four census areas you can build a territory out of. With "Select by zoom" ticked the level follows the map; untick it to hold one level while you work.
The control is on the territory card, not on the map. It has two parts:
| Select by zoom (ticked by default) | The census area follows how far in you are: states when you are far out, then counties, then tracts, then block groups |
| Select by: | Hold one census area regardless of zoom. Untick Select by zoom first |
Each census area only exists from a certain zoom onwards — block groups from quite far in, tracts a little further out, counties further out again. So:
- the menu greys out any area the map cannot draw at your current zoom;
- if you zoom out from under your choice, it drops to the finest area still available rather than letting you click at an area it cannot honour.
It does not silently select something else. If the area you want is greyed out, the fix is to zoom in — the quickest way being city search.
What "only exists from a certain zoom" looks like
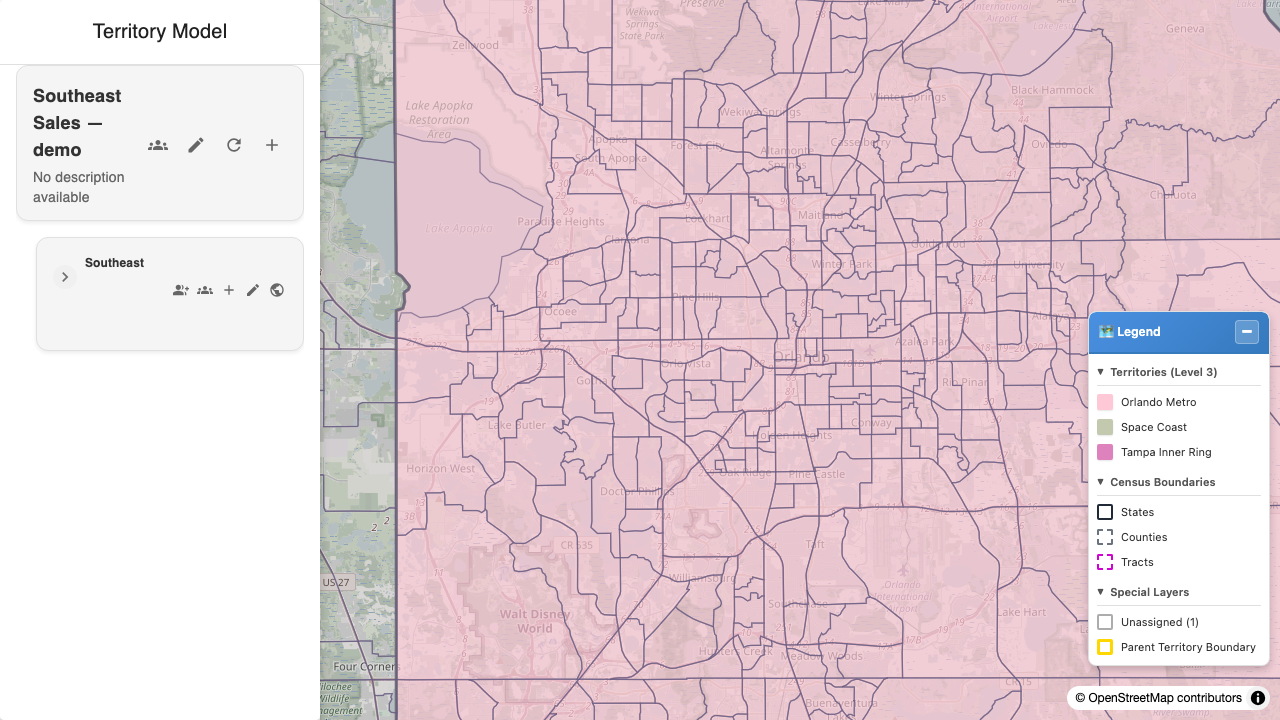
Metro scale. The legend's Census Boundaries list reads States, Counties, Tracts — block groups are not there, because the map does not carry them this far out.
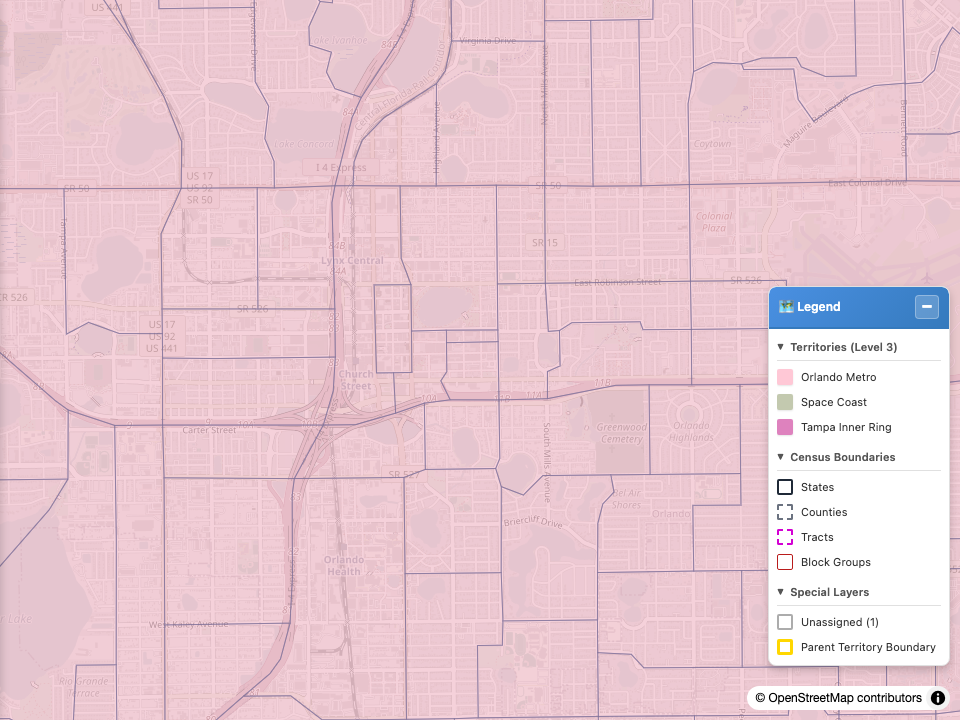
The same model, zoomed in. Block Groups has appeared in the legend, and those boundaries are now drawn and selectable. Nothing was switched on; the zoom is the switch.
🔴 These two images are of a populated demo model that the repository no longer carries — they predate 2026-10-13 and cannot currently be re-shot. They are accurate pictures of real census geography and the behaviour they show is current; they simply cannot be regenerated until the fixture is restored.
The three ways to select
Click
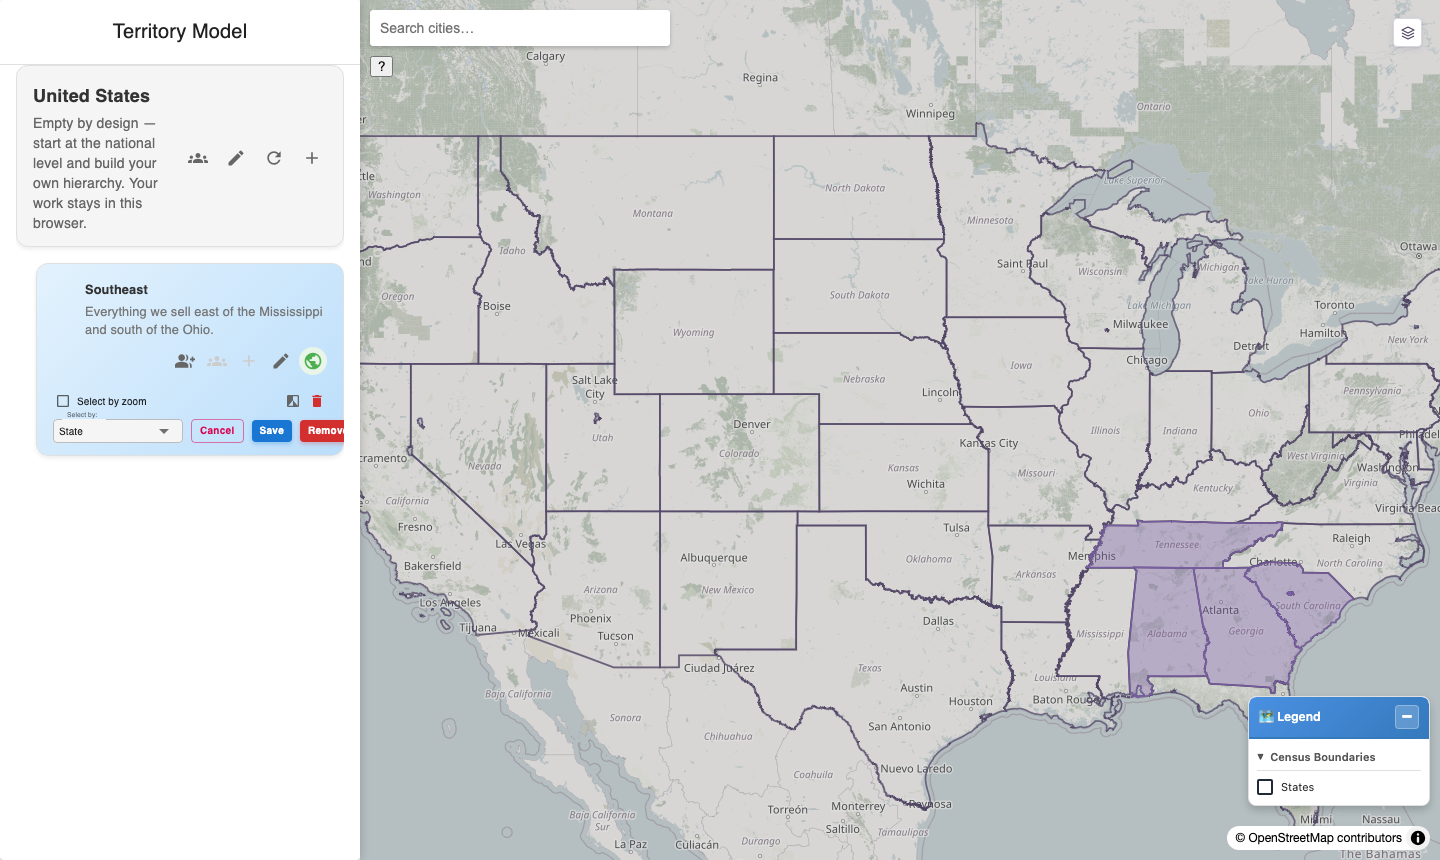
Three states selected by clicking. Selected areas fill in; clicking a selected area again removes it. Nothing has been saved yet — Save and Remove appear on the card as soon as a selection exists.
Click an area to add it. Click it again to remove it.
Click selection is answered in your browser, from the map already on screen, so it is fast — measured at well under 20 ms from click to visible highlight. It is also a preview: the authoritative shape is computed when you save.
Box — shift-drag
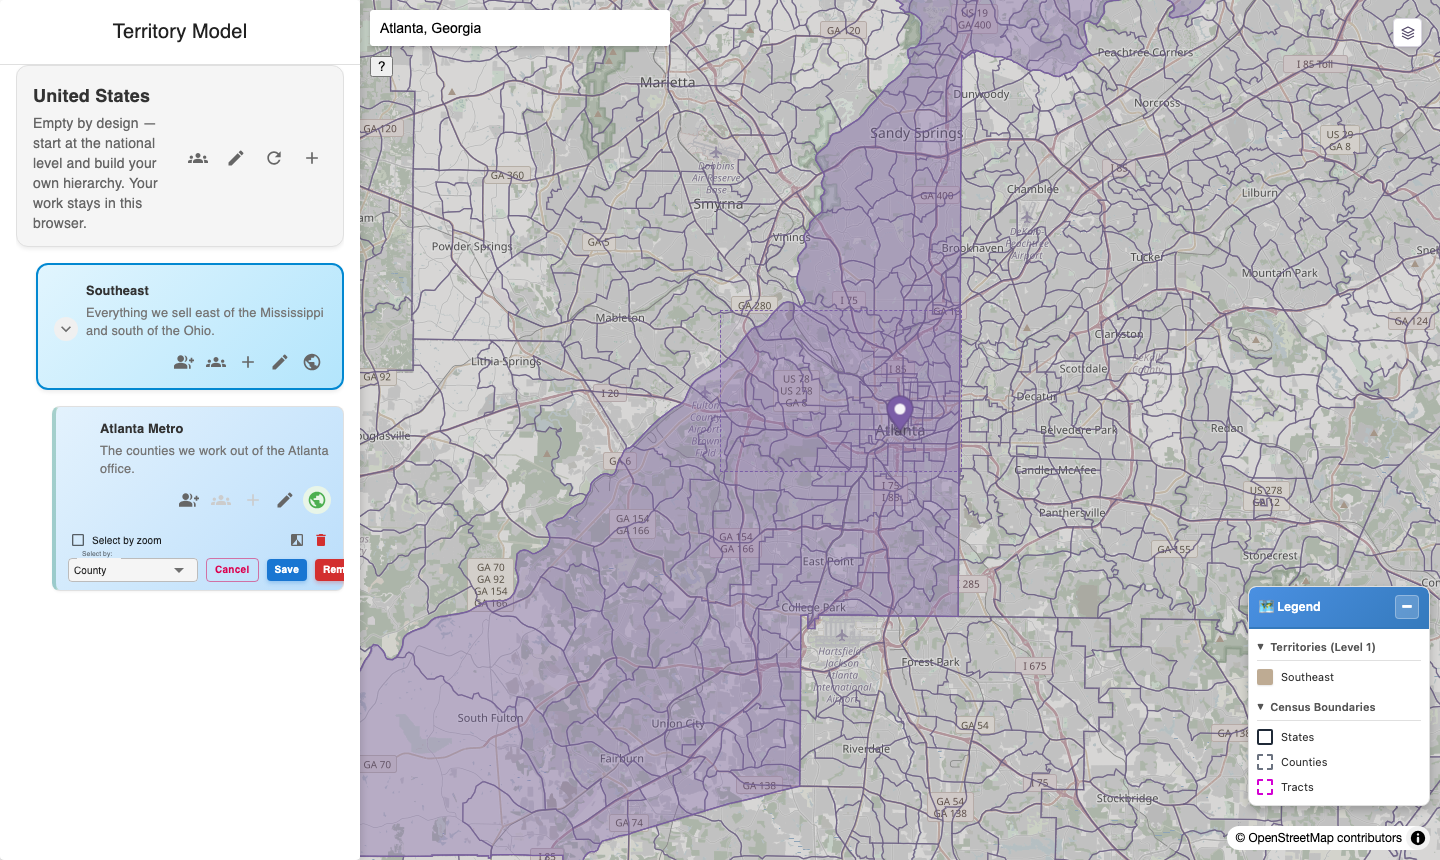
Box selection. Everything inside the rectangle at the current level is added at once — the fastest way to pick up a block of counties or block groups.
Hold Shift and drag a rectangle. Everything of the current census area inside it is selected.
This is the fastest way to cover ground, and it is the gesture most likely to take area from a neighbour without you noticing. See What happens to a neighbour.
If the territory you are editing has a parent with a boundary, the rectangle is clipped to the parent — you cannot select outside it by dragging past its edge.
Lasso — the polygon tool
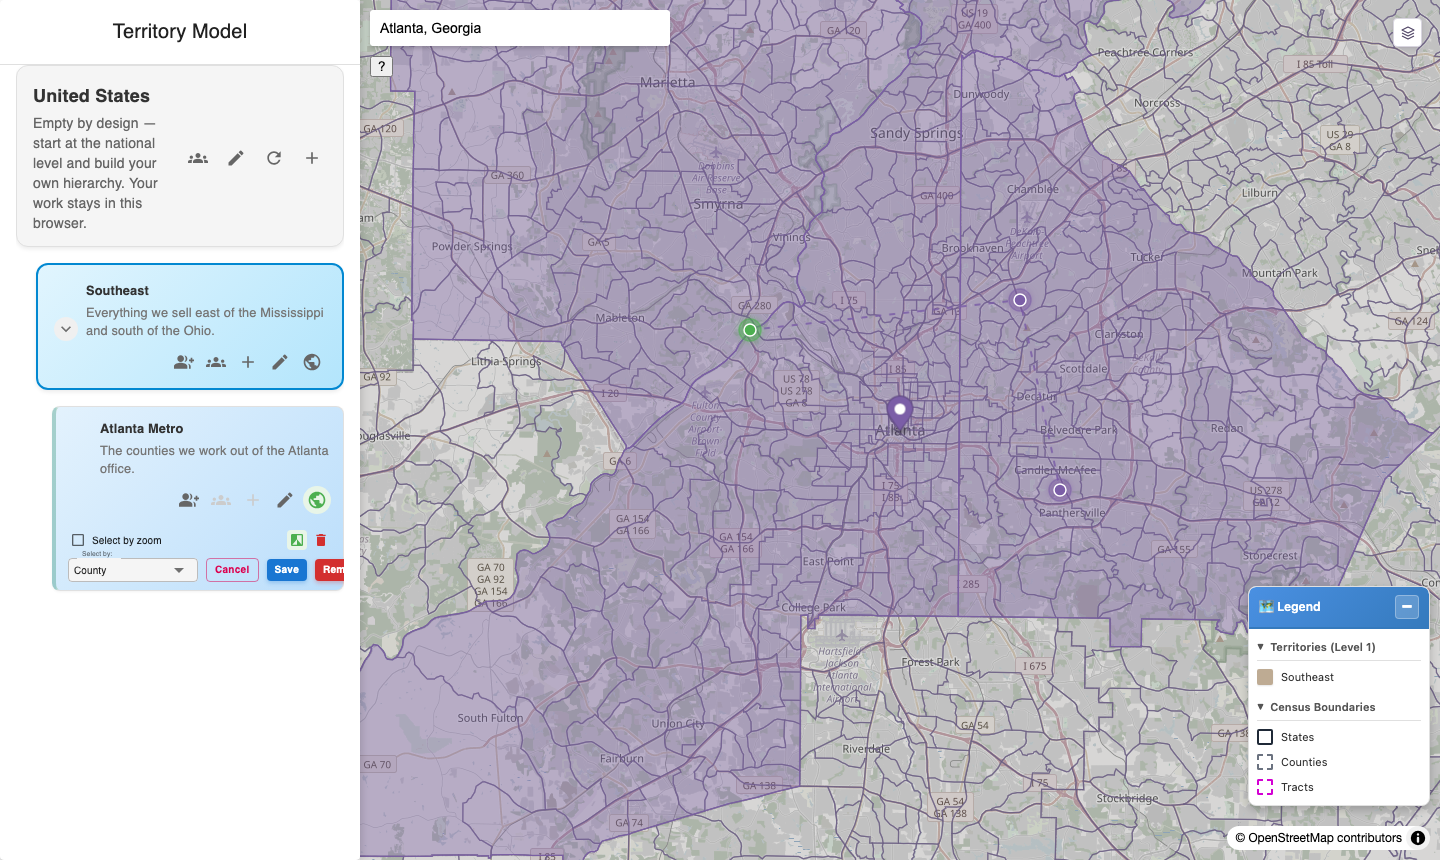
The lasso. Click to drop each corner of a shape, and everything inside it is selected — for coastlines, river boundaries and anything a rectangle gets wrong.
Press the polygon button on the territory card, then click to place each corner. Close the shape to select everything inside it.
Use it for anything a rectangle handles badly — a coastline, a river, a wedge of a metro. It is slower per gesture and far more precise.
The same gestures, one tier down
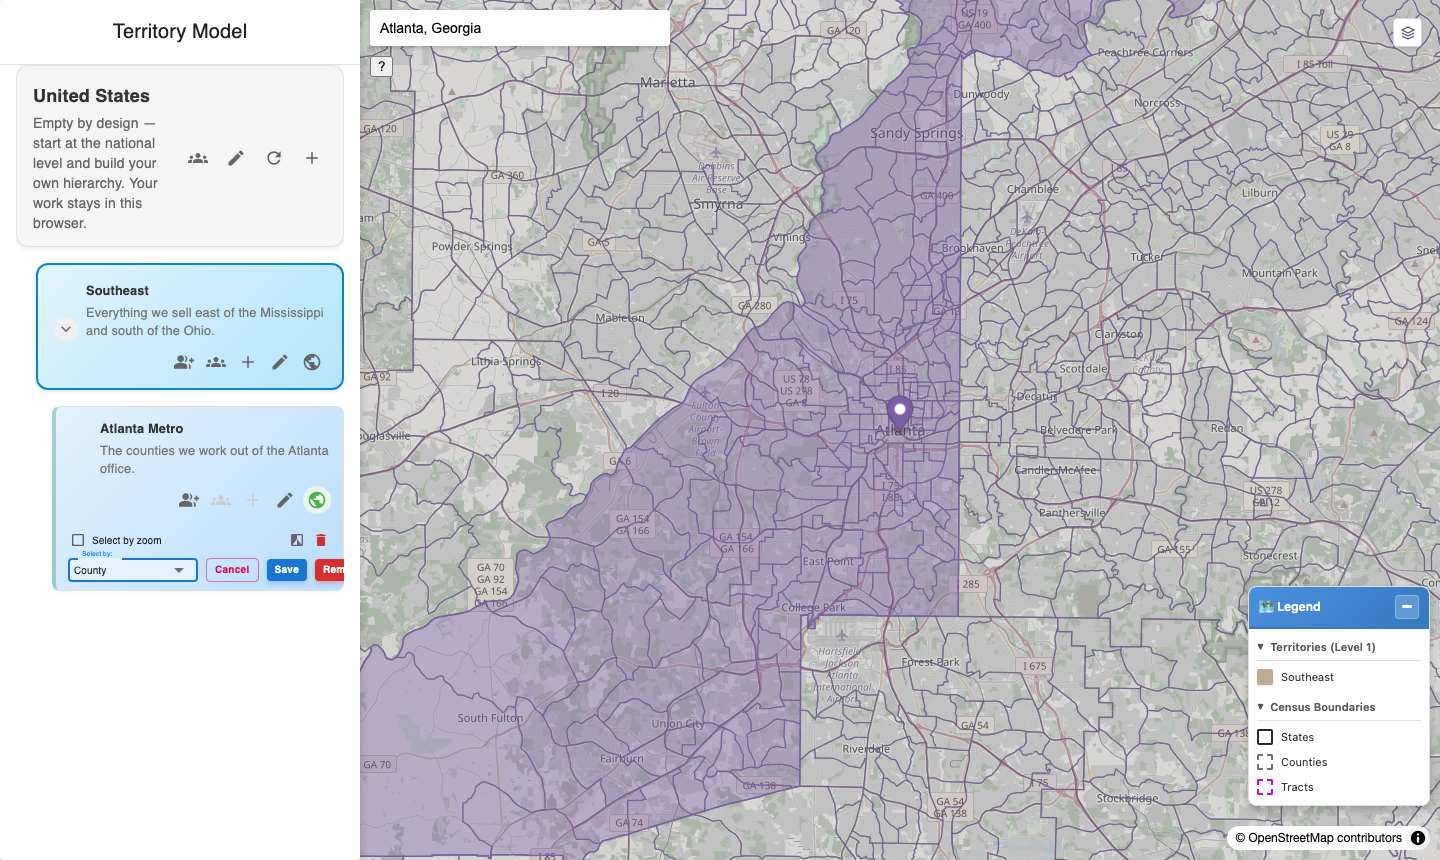
The same model, one tier down, built from counties. Two territories at the same depth can be built from different census levels — there is no rule that siblings match.
Saving
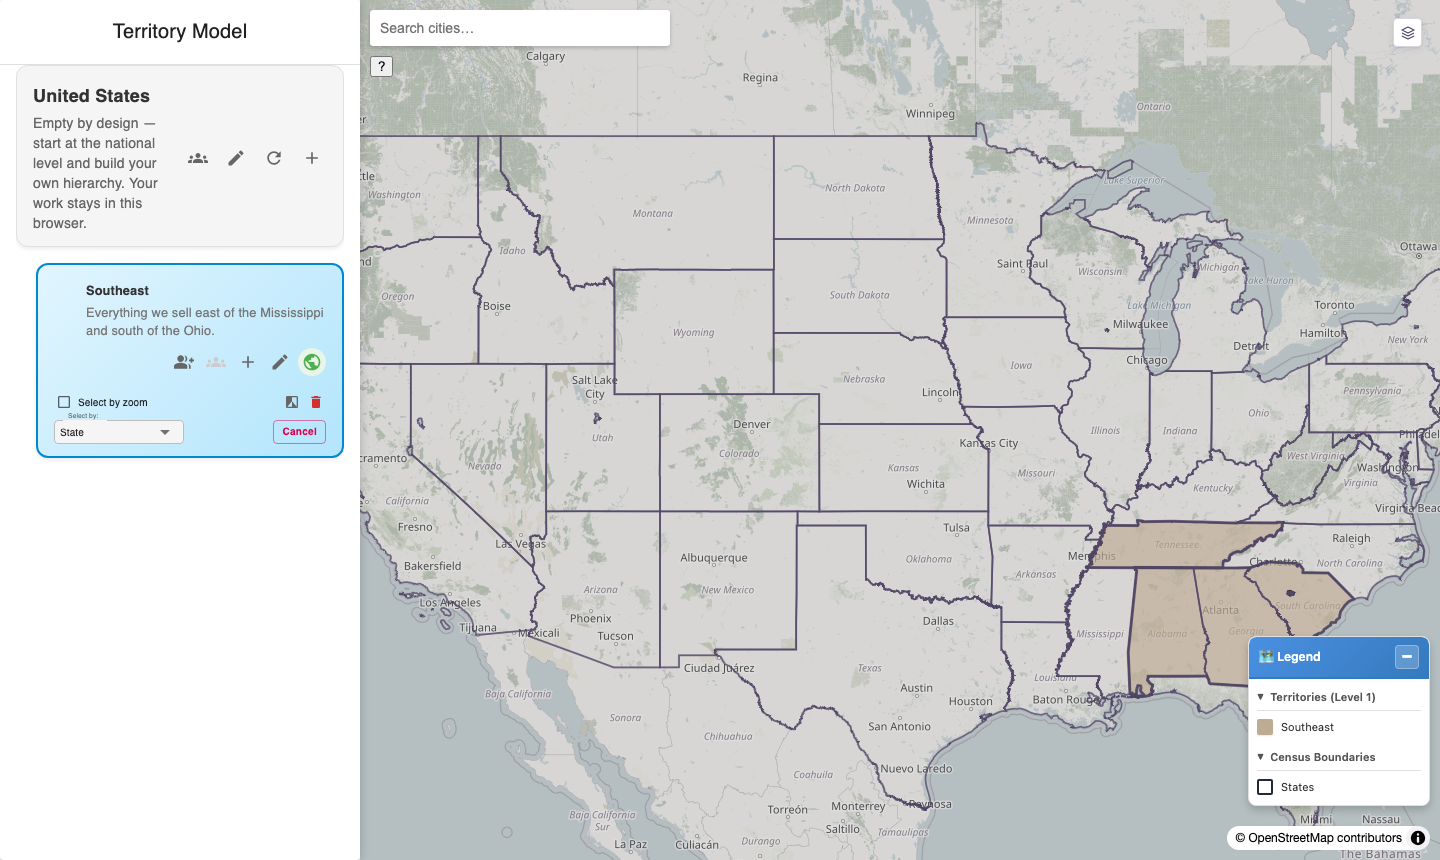
The saved boundary, drawn in the territory's own colour. Saved boundaries take effect immediately — there is no publish step and no draft to promote.
Save commits the selection. Cancel throws the selection away. Remove takes the selected areas out of the territory rather than adding them.
Three things happen on save, and it is worth knowing the order:
- The areas you selected are fused into one shape. Interior lines vanish.
- Any area that belonged to another territory is taken from it.
- The boundary is live immediately. There is no draft and no publish step.
⚠️ The list of areas is not kept — only the shape. To change a boundary later you re-select and re-save. See The two hierarchies.
Saving does not re-assign anything
Records already assigned under the old boundary stay where they are. Changing a boundary does not move records; nothing re-evaluates them on its own.
To move them, open Assignment Exceptions, select the affected rows and choose Re-run after a fix. Records that were assigned to the wrong territory rather than to none will not be in that queue at all — they were assigned successfully, just under a boundary that has since changed.
What happens to a neighbour
The area moves to you, silently. No confirmation, no warning, no notification to the other territory's owner.
🔴 And if your selection covers all of a neighbouring territory, that territory loses its whole boundary — every bit of ground it had, in one drag. The territory's Salesforce record survives, so it is still in your hierarchy afterwards; it simply has no map area left. You do not have to recreate it; you have to give it ground again.
Both behaviours are recorded as defects owed remediation. Until they are fixed, the practical advice is: before a large drag over ground that already has territories on it, look at what is there.
Clearing a boundary
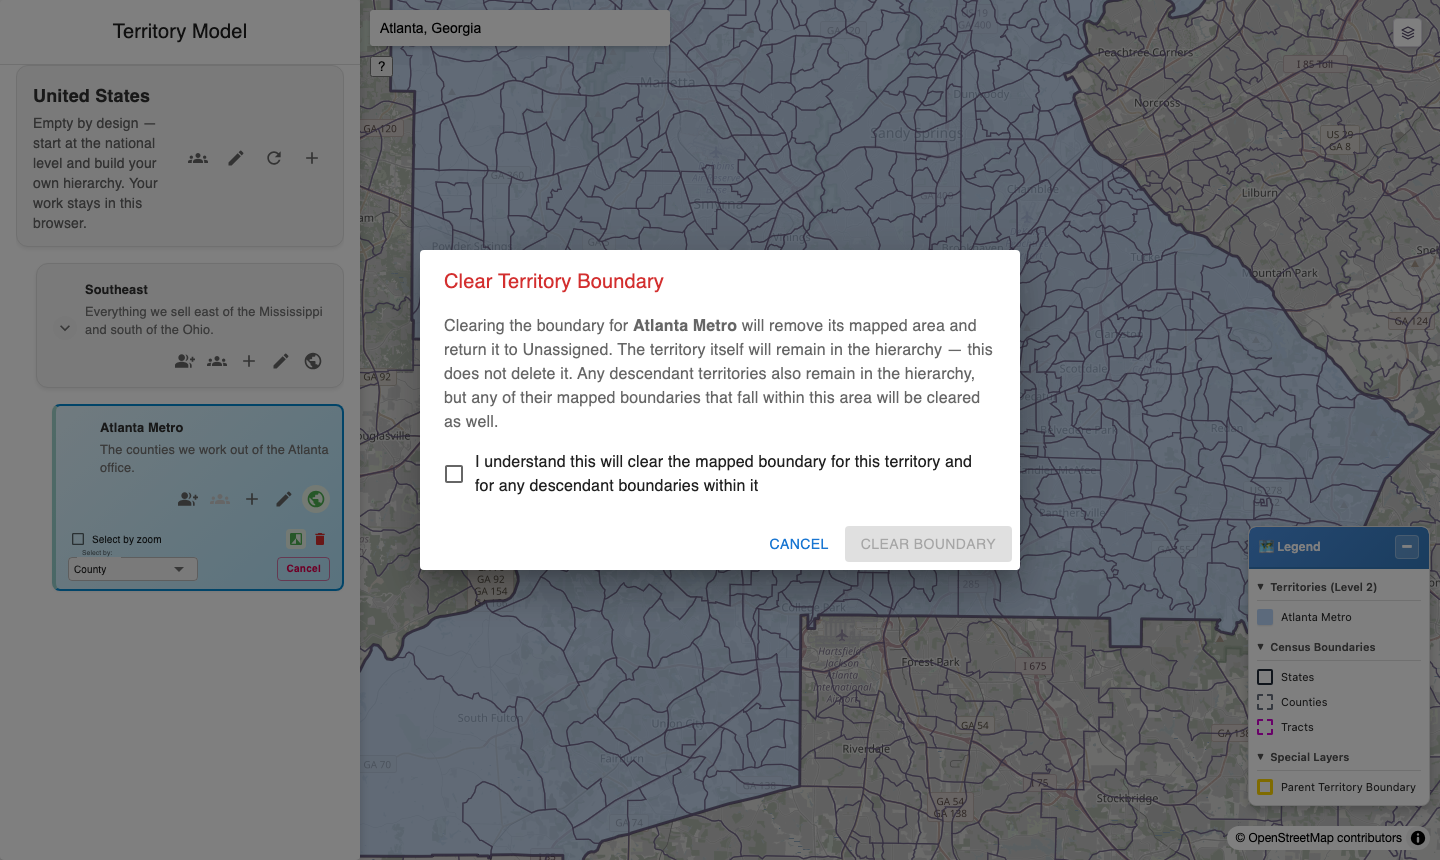
Clearing a boundary. Read the confirmation: it clears this territory's boundary AND every boundary beneath it, which is not what most people expect the bin to do.
The control is the red bin on the territory card. It is called "Clear territory boundary", and clearing a boundary is all it does. The ground the territory covered goes back to Unassigned; the territory itself stays in your hierarchy and is still there after a refresh. Use it when a territory's area is wrong and you want to start its boundary again.
What to expect:
- It does not remove a territory from the model. Removing a territory from the hierarchy is done in Salesforce setup, not here. Nothing in the map application deletes a territory record.
- It can also clear boundaries beneath it, and it goes by area rather than by parentage. Any lower-level territory whose boundary lies inside the area you are clearing has its boundary cleared too. That is a geographic test, not a hierarchy one — so a child territory whose ground sits outside the cleared area keeps its boundary, and a territory that is not a child of this one but does sit inside the area will lose its boundary. Those lower-level territories also remain in your hierarchy.
- This second part happens in the background, just after the first part reports success. If it does not finish, you will not be told. If lower-level boundaries look wrong afterwards, refresh and check them.
- On a territory that has never been given any ground, you are told plainly that there is nothing to clear — "<name> has no mapped boundary to clear." Nothing is broken; there was simply no boundary.
⚠️ Clearing a boundary still destroys real work. The territory record survives, but the selection that built the boundary is not stored anywhere and cannot be recovered — you rebuild it by hand. That is why the dialog asks you to confirm.
Reading the map
Because map labels are not drawn yet, the map distinguishes territories by four things other than a name:
| What you see | What it means |
|---|---|
| Fill colour | Identity. Each territory in a sibling group gets its own colour, from a fixed 20-colour palette |
| Grey outline, no fill | Unassigned — the area inside your model that no territory covers. It is not a territory |
| Heavier outline | A shallower tier. Outline weight encodes depth; colour never does |
| Yellow outline | The parent territory boundary — the edge your selection is clipped to |
| Muted, washed-out fill | Focus mode: you are working inside one branch and the rest is dimmed |
Hover a territory to see its name, and read the legend for the rest.
⚠️ One thing the design specifies that the map does not draw yet, stated so you are not looking for it: a diagonal hatch distinguishing a locked territory and a repeated palette colour. The patterns exist; they are not applied to these layers. Until they are, a locked territory looks like any other, and past 20 siblings two territories can share a colour with nothing to tell them apart.
Performance
Click selection is fast and does not touch the server. Box and lasso selections do, and their cost grows with how many areas they cover: a rectangle over a metro at block-group resolution can be tens of thousands of areas.
If a large drag feels slow:
- Zoom out one step and select coarser areas, then refine.
- Split the drag into a few smaller ones.
- The first large drag over an area is the slowest; repeats are faster.
Next
People, roles and assignment — who works a territory, and how records reach it.
Last verified: 2026-10-13 · Owner: MapKraken Labs LLC
Something on this page wrong, or a setup step missing? That is a documentation defect and we want it — tell us and this is the page that gets fixed.